
Friday, 24 December 2010
Merry Christmas Crafters...
Wishing everyone a very merry Christmas and a happy and healthy New Year...


Monday, 29 November 2010
A sneak peek for January...
Our cards in January are going to be courtesy of Lynda. Here is a sneaky peek at what we are going to be doing...

 Our cards this month will be utilising punches and the cuttlebug.


Sunday, 24 October 2010
November 2010
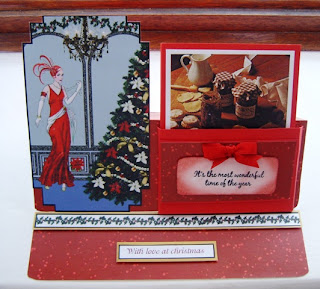
The last class of the year for the cardmakers will be an easel card, with a twist - project by Jackie. Also included will be a set of Christmas recipe cards, to make this a combined gift/card. The images are courtesy of Debbie Moore, and the Mince pie recipe is from Cooking for Christmas, by Josceline Dimbleby.
 The card has its own box - made from festive red card.
 The recipe cards that sit inside the cunning pocket on the front of the card....
 The card has its own box - made from festive red card.

The card, face on.
Tuesday, 12 October 2010
October 2010
 This month, our project was courtesy of Brenda, and utilised the Arty Farty Bella Parasol template. The side of the card was punched using a Martha Stewart punch, and a complementary panel was punched in the same card as used for the parasol.
 Paper roses were used to decorate the top of the parasol, and it was edged with lace.
September 2010
This month we were spoilt for choice with projects provided by Debbie Williams.

The first was an easel card, complete with cute snow family and "button" embellishments.

The second was a decoupaged Christmas pudding on a springy base. This fold is surprisingly easy and effective. The key point to remember is that the card should be made from heavyweight paper or thin card. Too thin and it isn't robust enough to stand up, too thick and it isn't malleable enough to successfully fold.

The final card was a decoupaged winter scene with cute little figures.
Unfortunately, I seem to have lost the photo, so will have to take another one. To be posted at a later date...!!

The first was an easel card, complete with cute snow family and "button" embellishments.

The second was a decoupaged Christmas pudding on a springy base. This fold is surprisingly easy and effective. The key point to remember is that the card should be made from heavyweight paper or thin card. Too thin and it isn't robust enough to stand up, too thick and it isn't malleable enough to successfully fold.

The final card was a decoupaged winter scene with cute little figures.
Unfortunately, I seem to have lost the photo, so will have to take another one. To be posted at a later date...!!
Monday, 20 September 2010
Another tip - Paper roses
This time, we are looking at a rose made from a simple six petal flower paper punch. All that is needed are three flowers punched out of whatever paper you choose. Plain paper with the edges coloured in, pre coloured paper, or why not stamp a pattern onto your paper?
I used plain paper, just adding a touch of colour to the petals using aquamarkers watered down. The leaves aren't really rose leaves, but this was the only leaf punch I could find!
Additional touches can be added, such as a drop of glaze to simulate raindrops, or some quicky glue pen and glitter to just give it some bling!
This tutorial by In 2 Crafting (another blog well worth a visit, with lots of hints, tips and inspiration) uses a 2" punch, but I have done it with a much smaller one and although fiddly, works out just fine.
This is what you can end up with:

I used plain paper, just adding a touch of colour to the petals using aquamarkers watered down. The leaves aren't really rose leaves, but this was the only leaf punch I could find!
Additional touches can be added, such as a drop of glaze to simulate raindrops, or some quicky glue pen and glitter to just give it some bling!
Another tip... faux pearls
Sue Wilson demonstrated a really cool way of making your own "faux pearls" on create and craft tv this week.
Basically, you put dots of "dries white" glue onto waxy paper (I tried it with the strips from the back of wide double sided tape and it worked a treat!) and then when they are dry, brush them with mica pearlescent powder. Use the white, or any other colour mica powder you have - the result is amazingly close to the stick on pearls you buy. Sue recommends spritzing the finished "pearls" with water to set the powder.
If anyone is interested in other things she is doing/has done, you should check out her blog - this is a link to the faux pearls tip and there is also a photo of the aforementioned pearls...
Basically, you put dots of "dries white" glue onto waxy paper (I tried it with the strips from the back of wide double sided tape and it worked a treat!) and then when they are dry, brush them with mica pearlescent powder. Use the white, or any other colour mica powder you have - the result is amazingly close to the stick on pearls you buy. Sue recommends spritzing the finished "pearls" with water to set the powder.
If anyone is interested in other things she is doing/has done, you should check out her blog - this is a link to the faux pearls tip and there is also a photo of the aforementioned pearls...
Thursday, 19 August 2010
Don't forget - Club starts again in September!
The next card making class will be on 25th September 2010. The project being done will be by Lynda or Brenda - further details to be added later.
Sunday, 27 June 2010
Summer school preview... 31st July 2010 part 2
The second part of the programme for the papercraft summer school are two cards which offer the opportunity to try out the cuttlebug, and also some stamping/colouring with foam pads to make a decorative background, topped with "innie" or "outie" decoupage.
Card 1 utilises the Bug, and a stamped image, coloured and cut out in an oval shape using nestabilities.

Card 2 has a choice of backgrounds, or topper. Both "innie" and "outie" images will be available. The background will either be stamped butterflies in complementary colours, or a sponged random effect, topped with a spritz of mica spray to add necessary "bling".


Card 1 utilises the Bug, and a stamped image, coloured and cut out in an oval shape using nestabilities.

Card 2 has a choice of backgrounds, or topper. Both "innie" and "outie" images will be available. The background will either be stamped butterflies in complementary colours, or a sponged random effect, topped with a spritz of mica spray to add necessary "bling".


Saturday, 26 June 2010
June 2010
There were two cards on the menu today, courtesy of Jackie...
The first was a bow fronted card, with a stamped and coloured image inside. Oval nestabilities were used to create the aperture, with a contrast colour card used behind the white base card. The image was coloured using promarkers, and there was a choice of five different images - small girl having a picnic, small girl watering flowers, small girl chasing butterflies, small boy collecting apples or a small boy fishing.

The second card was a black and white image, layered onto black and white card and using a black card base. The black layer card was embossed using a cuttlebug folder, to provide some interest.

The first was a bow fronted card, with a stamped and coloured image inside. Oval nestabilities were used to create the aperture, with a contrast colour card used behind the white base card. The image was coloured using promarkers, and there was a choice of five different images - small girl having a picnic, small girl watering flowers, small girl chasing butterflies, small boy collecting apples or a small boy fishing.

The second card was a black and white image, layered onto black and white card and using a black card base. The black layer card was embossed using a cuttlebug folder, to provide some interest.

Subscribe to:
Posts (Atom)