A bracelet was on the menu today for our beaders...
Deceptively simple, this was a project definitely worthy of praise and made in a variety of colours, according to the beader's choice.
There are no more classes now until January, but here is a sneak preview of what will be made then - this charming lacy necklace!
Saturday, 6 December 2008
Thursday, 27 November 2008
Craft class - 29th November 2008
This was the last class for 2008 for the paper crafters. We had a selection of projects on offer today -thanks to Brenda - from a magnificent car made using an Arty Farty template, to a selection of Christmas cards.
This card was made from Cream card stock, matted and layered with gold card, and a piece of cream card embossed with the Christmas tree from Cuttlebug.
The tree was highlighted with glue (blue glue that dries white in a pen is best to use) and then glittered.
A border peel-off was used around the edge of the gold card.
A sentiment was put along the bottom of the card to highlight the effect.
The other card was made in two shades - using gold and silver card. An A6 white card was used as a base, and fancy metallic gold or silver card was used as the bottom layer, edged with peel-off.
The Christmas trees elements on the cards were made by sticking a peel-off onto acetate and colouring with permanent marker pen. They were then cut out and stuck on white glitter card, layered onto the base gold/silver card. The stars on the top were gems stuck on with glue. The small sentiment finished off the card.
Saturday, 8 November 2008
Advanced beading - 8th November 2008
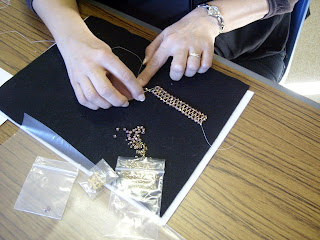
Todays project was a charming (if complicated!) bracelet.
This finished example was done in a gold and a bronze colour, but others were done in shades of pink, purple and blue, as you can see from the picture below, where you can see a bracelet in progress.
There is no class in December for the advanced beaders, but a sneaky preview of the project for January is here: a lovely butterfly necklace!
Monday, 27 October 2008
Saturday 25th October 2008 - Craft class
There were two projects on the go at this months craft class.
The first project was two cards - one for a birthday and one for Christmas.
The DL size birthday card involved a lace up front element, over a patterned background, with attached tags. A chiffon ribbon was used to lace up the front. The card was finished with a greeting matted and layered onto a small piece of card. This card was made using a kit from Sue Smith at http://www.kameocards.co.uk/
The Christmas card was made from White hammered card, cut to a DL size. Small square images were matted and layered onto silver card and then put onto blue backing paper using foam pads. A silver greeting sentiment was placed at the bottom of the card using foam pads.
The second project was a small memory book. Cunningly made from a 12" square piece of scrapbooking paper, it provides 7 double pages for photographs and sentiments.
With a ribbon fixing, it is an ideal small gift, especially if presented in a custom made box.
Sunday, 28 September 2008
Saturday 27th September 2008
Thanks to Lynda, for the cards this month.
Today at the crafting class, we made two cards, using embossed backing papers made with a cuttlebug machine, diecut flowers, a rubberstamped bear image and ribbon.
The first, a standup card was made with plain white card. The embossed backing sheet was cut to size and stuck on the front and bottom. The diecut daisies were attached using sticky pads. Diecut greeting banners were used at the top and the bottom, with a peeloff greeting. A sentiment was cut to size and stuck in the back.
The second was a white DL card, embossed with frames from the Glitter girls Framey board. Corner peel offs were used on the top right and bottom right corners. Ribbon was threaded down the front left hand side and a bow attached. The stamped image was cut out and mat and layered onto the embossed and ribbled backing papers.
Saturday, 13 September 2008
Saturday 13th September 2008
Beading Beginners - Tubular Necklace
Tutor - Ann
This month's project looks deceptively complicated, but our beginner beader's certainly enjoyed making it! A matching bracelet could be easily made with this design.
Also seen in the photograph (on the left) is a sneak preview of the necklace being done next month...
This is a close up photograph of this month's necklace.
Saturday, 6 September 2008
Advanced beading - 6th September 2008
Todays class was the first meeting of the advanced beader's since the summer workshops in July.
Some people were still on holiday, but there were still a number of ladies making this month's project.
Crystal beads were used in a versatile way to make clusters which could become either a bracelet, necklace or earrings. This is a closeup shot of the bead clusters put together.
Delicate and beautiful!
Thursday, 31 July 2008
A very enjoyable weekend!
Around 75 ladies became Busy Bees for the weekend at the first ever Busy Bees Summer workshops. We all had a really good time, learning new skills, chatting to like minded people and swapping hints and tips. For those who had brought their purses, there was an abundance of crafting goodies to purchase, and Debbie Williams (from Crafters Delight and Demonstrator on Create and Craft TV) very kindly donated some prizes for the raffle. Six very lucky crafters went home with more equipment than they came with!
All in all it was a great weekend. Many thanks must go to Ann Turner, who was not only the brains behind the event, but who also took on the lions share of the organisation of it. And she also baked the very tasty cakes which were available at tea time!
Now we move on to our regular classes, which begin again in September. The beading classes are fully subscribed and there is a waiting list, but there are still places available in the cardmaking class, which is on 27th September, at 10.00 am.
Monday, 28 July 2008
26th and 27th July 2008
For the first time, Busybees will be running a whole weekend of Summer Craft Workshops in both beading and card making.
They will be held over the weekend of 26/27 July and will be based at the North Romford Community Centre, Collier Row.
The centre does not provide food - you will have to bring your own packed lunch and snacks - but drinks will be available to buy.
There will be two crafting sessions each day for card making - from 10am to 12.30 pm and then from 1.30 pm until 4pm - and you can choose from a range of projects.
For beading, each project will take the whole day, but will be split up into two sessions, with a break for lunch.
See these posts for more details about the programme.
Saturday Beading - £28.00
Saturday Section A - £19.50
Saturday Section B - £16.00
Sunday Beading - £27.oo
Sunday Section C - £19.50
Sunday Section D - £16.00
If you would like an application form, please send an email to busybees.craft@googlemail.com
or telephone Ann Turner, on 01708 768580
Sunday, 27 July 2008
Sunday 27th July 2008 - Beading
Sunday 27th July 2008 - Section C
Tutors - Doreen Bloomfield and Debbie Williams (from Create and Craft)
Cost - £19.50
Projects
3 cards featuring decoupage
6 very special cards for all occasions
Please bring along the following tools, if you have them.
* A mouse mat or similar
* a 5mm or 6mm ball tool
* scissors
Cost - £19.50
Projects
3 cards featuring decoupage
6 very special cards for all occasions
Please bring along the following tools, if you have them.
* A mouse mat or similar
* a 5mm or 6mm ball tool
* scissors
Sunday 27th July 2008 - Section D
Tutors - Jackie and Brenda
Cost - £16.00
Projects
A card incorporating a box with an acetate window, filled and decorated with stamped and embossed flowers or butterflies. More than a card - a keepsake.
A Hearts entwined card - this pretty card is decorated with a double heart embellishment trimmed with cream roses and butterflies.
Champagne bottle card - cream card decorated with green and cream scalloped edge. A champagne bottle sits on the front of the card. Suitable for any occasion.
Please bring along the following tools, if you have them.
* A craft knife and cutting mat
* double sided tape
* clear glue
* pva glue
* colouring pens or pencils
* a heat embossing tool
* a long ruler
* scissors, large and small
* ball tool
* pencil
Saturday, 26 July 2008
Saturday 26th July 2008 - Beading
Saturday 26th July 2008 - Section A
Tutors - Doreen Bloomfield and Debbie Williams (from Create and Craft)
Cost - £19.50
Projects
2 boxed cards using "Toe Tappers" shoe template
A card suitable for birthday, wedding, moving home, get well, any occasion.
Please bring along the following tools, if you have them.
* A mouse mat or similar
* a 5mm or 6mm ball tool
* a long ruler
* an embossing tool
* eyelet setter
* scissors
Saturday 26th July 2008 - Section B
Tutors - Jackie and Brenda
Cost - £16.00
Projects
A card incorporating a box with acetate window, filled and decorated with stamped and embossed butterflies. More than a card - a keepsake.
Cameo card - trimmed with pale blue and white frames, edged with silver peel offs and featuring a pale blue cameo style head with a silver surround.
Fairy Dell card - decorated with silver peel offs as an embellishment in each corner. On the front, a fairy matchitt embellishment sits in a circle. There is a small flower to complement the fairy matchitt.
Please bring along the following tools, if you have them.
* A craft knife and cutting mat
* double sided tape
* clear glue
* pva glue
* colouring pens or pencils
* a heat embossing tool
* a long ruler
* scissors, large and small
Monday, 30 June 2008
Saturday 28th June 2008
Tutor today: Brenda
Project 1
A5 white card decorated with dry embossing (using a "Glitter Girls" board)and a black highlight strip. Topped with a card handbag made from a template. The flap of the handbag is stamped with stazon glue pad and covered with fine glitter. Sentiment and decorative gems are placed on the front of the bag and the handle is made from very narrow black ribbon with a side edge of gold.
Project 2.
Ideal card for a man - vintage car decoupaged onto silver and black backing papers and decorated with peeloff strips and gems for headlights. The silver backing card was embossed using a Cricut embossing machine. The black corner details were made using teabag folds.
Saturday, 14 June 2008
Saturday 14th June 2008
Beading Beginners - Necklace with faceted crystal bead drop
Tutor - Ann
Lots of ladies (and one gentleman!) attended todays class to make the single strand of beads necklace with crystal faceted bead drop.
And of course, to buy some extra beads for their own projects! Materials for each project are ordered before the class, but if any other beads are wanted, Ann will do her best to obtain them if they are not already available.
Saturday, 31 May 2008
Saturday 31st May 2008
Tutor today - Laura
Project 1 - Lily Card
Card made using white arum lily backing paper, with a complementary green paper on the front. Purple card used as the base for the teabag flower motif, that is decoupaged.
Project 2 - Butterfly card.
Card made landscape style using pink backing paper and toning ribbon embellishment. Die cut butterfly decorated with diamonte embellishments and attached to card on opposite side. A jewelled brad is used as a highlight in the bottom right hand corner.
Saturday, 26 April 2008
Saturday 26th April 2008
Saturday, 22 March 2008
Saturday 22nd March 2008
Tutor today - Jackie
Projects
Faux Picture frame card
This card was made using printed card with a satin finish. Using folds, the contrasting "borders" of the frame were made. The picture used in this card was taken from the Joanna Sheen Fashion Boutique cds and a feather and peel offs were used for embellishment.
Tulip Decoupage Card
This card was a square card base, decorated by using two complementary backing papers and a mat and layered tulip picture, decoupaged. A greeting tag was applied to the bottom right of the card and a ribbon bow was applied as an embellishment.
Monday, 7 January 2008
Welcome to Busy Bees...
Busy Bees Craft Club operate beading and cardmaking/papercraft classes. The beading classes are divided into Beginner and Advanced and are held monthly. Cardmaking and papercraft classes feature a variety of techniques, and a mixed ability class is held monthly.
Currently there is a waiting list for both beginners and advanced beading classes.
Subscribe to:
Posts (Atom)